
How to Capture Bioluminescence
- birley1
- Nov 16, 2025
- 12 min read

Stanmore Bay November 2025
Photography Page
After the crazy bioluminescence aka "Aurora of the Sea" aka "Blue Goo" craze hit town last weekend, I have been inundated with people asking me how to go about capturing this blue gold! To me, it is one of the toughest natural phenomena to capture but also the MOST SPECTACULAR!
I am by no means an expert but I am happy to share the little I know.
It is similar to capturing aurora, for the most part anyway, and lends itself to most nightscape capturing techniques. Unlike the aurora that lights up the sky and the foreground, bioluminescence does not, unless it is a huge bloom like last Friday.
It also creates a juxtaposition with routine nightscape techniques because the bioluminescence can become a vibrant and hard-to-expose subject, unlike the usually unchanging dark foreground you're usually faced with. Where you usually only have to expose primarily for the sky, you now have to truly factor in the ever changing subject that is surrounded by a pitch black foreground too.
So it is a balancing act between exposing enough to capture the blue in all its glory but not overexpose so as to blow out the highlights, on the flip side expose enough to capture some detail in the absolute darks/shadows and then you have the sky to consider too.
If you expose for the bioluminescence you don't get enough detail in the blacks and vice versa if you expose for the darks you blow out the highlights in the bioluminescence.
For me, the bioluminescence is the star and so I base my settings on nailing that and deal with the rest in post. You also have to decide how you would like to capture and ultimately present your bioluminescence image. I absolutely love the detail and textures you find in a breaking bioluminescent wave - it truly is otherworldly.
To capture that, you need to have much shorter exposures (just like aurora) which means you need to pull more light in somewhere else and so you are forced to bump up your ISO.
These days with denoise and sharpening software being so good, that is not generally a problem. Also most modern day cameras tend to handle noise better too.
The lens
Wider is better (imo anyway) and the faster the lens (aperture) the better. A lens that can get to f/2.8 and lower makes life a lot easier than one that only stops up to f/4.0 for example. In saying that, don't go rushing out to buy a new lens (unless portrait or nightscape photography is something you are serious about) as any lens will work - you just need to find the sweet spot and work with what you have.
The best camera and lens is the one in your hand!
Enough idle chatter, let's get to why you have chosen to read this!
I know many just want the nuts and bolts so I will list a basic set up next, so if you are not into reading and just want the short and sweet version, here you go.
If you would like a little more detail (with pictures) behind the settings and the reason I suggest them, carry on reading below.
I capture in RAW only as I like to edit my images and have full control of the data captured. If that is not for you, then capture in JPEG and let the camera do the work.
Short and sweet/Nuts and bolts version for a DSLR:
Longer exposures:
Capture in RAW if possible (unless you don't want to edit your images)
On a tripod or something to hold the camera up and dead still
Timer or shutter release - many cameras have a two second timer built in
Ensure you are in focus - ALWAYS manual focus
Aperture - lowest you can go - f/2.8 and lower is ideal but not the be all and end all if your lens can't go that low
Ensure all in-built stability features are turned OFF on both your lens and body
Exposure time 10-20 seconds (can be longer if you want)
ISO based on your exposure time. Use your exposure time to create the effect you are after and set ISO based on that
Always proof/check your images and make changes as necessary
Shorter, more detailed focussed exposures:
Capture in RAW if possible (unless you don't want to edit your images)
On a tripod or something to hold the camera up and dead still
Timer or shutter release - many cameras have a two second timer built in
Ensure you are in focus - ALWAYS manual focus
Aperture - lowest you can go - f/2.8 and lower is ideal but not the be all and end all if your lens can't go that low
Ensure all in-built stability features are turned OFF on both your lens and body
Exposure time under a second up to 5 seconds - I find at 5 seconds you already lose too much detail at times
ISO based on your exposure time. You may have to push this but remember the bioluminescence does light up the foreground somewhat if it is super vibrant.
Always proof/check your images and make changes as necessary
For those wanting a little more, let's delve into it a little deeper here.
Let us start off with and what is possibly the most important setting to get correct, and that is your FOCUS. Setting focus at night can be a nightmare. Before we go any further, it is important to ensure that if your lens has an in-built stabiliser to turn that off and that goes for your camera body too. When you are shooting long exposures, when these are enabled the camera then compensates to try and figure out what is going on! Remember if you are a daytime photographer to switch those back on the following morning. I cannot tell you how many times I have got that wrong or am presented with the most incredible sunrise only to find I have not re-enabled those and also I’m shooting at an ISO of 32,000!
So be sure to check your settings before you start capturing every time - day or night!!

AF and lens stabiliser off as well as the in-built stabiliser on the body
So back to focusing under the cloak of darkness. The best is to test this in the day as that makes life a lot easier. For the most part, you will be focusing on infinity, so it helps if you know where and how that looks on your lens.

Know where the infinity sits on your lens - usually an infinity logo like this
Set the lens up that you are going to use, focus on something in the far distance and use your automatic focus to get it in focus. I would then, if your camera has a back screen and a magnification function like mine does with a magnifying glass in the corner, zoom in while focused and doublecheck the accuracy of that focus.

In the day use AF and focus on something in the far distance
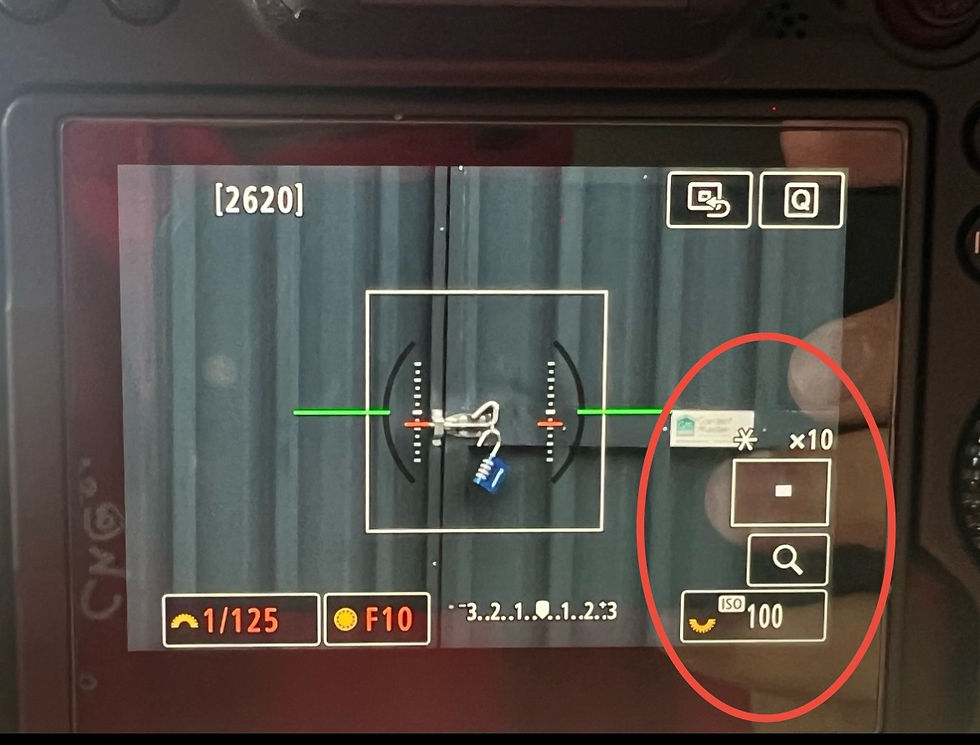
Then use the magnifying function if you have one - gives me 10x zoom for accuracy
You will be amazed how many cameras using the auto focus are a smidge out. Once you have got the sweet spot, memorise and make a note of exactly where the setting sits on the focus ring/barrel of your lens. Again, you will be pleasantly surprised how many lenses are slightly off the infinity mark on the lens itself. If you are unable to auto focus, the quickest way is to turn your lens to the infinity sign, and then use the back of screen and magnification to fine tune it.
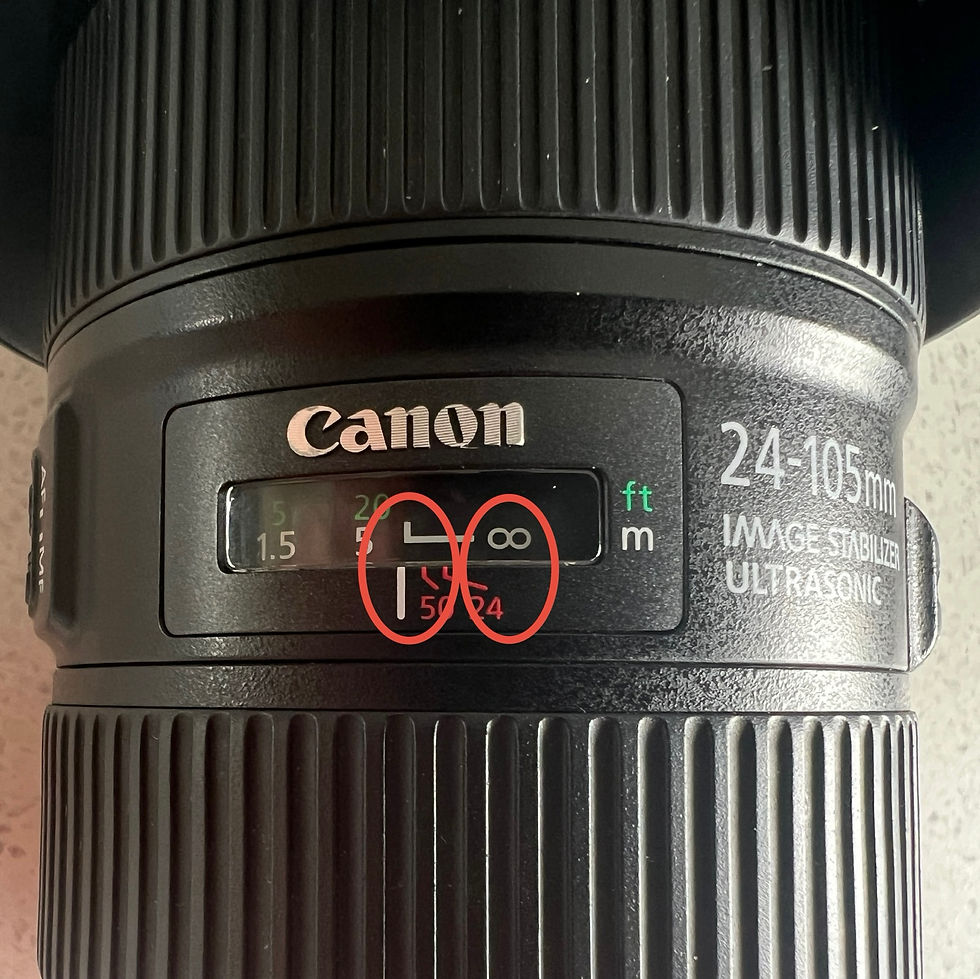
Infinity sign vs actual infinity on the lens
You can also go so far as to tape your focus ring down once you have ascertained the sweet spot during the day and that will assist you when out that night. Again, very important to note that for some reason lenses do tend to go slightly out of focus as the night progresses, and so check your focus constantly. Also, if you are like me who is in the habit of bumping the focus ring and being none the wiser, checking it regularly will avoid utter gut wrenching disappointment the next day when you realise all your bucket list images are out of focus. Ask me, I know!

Realising the following day you were OOF (out of focus)!! Really stings but makes for beautiful Bokeh - It really is a thing
If you are unable to set that up during the day and are faced with the task of setting your focus in the pitch dark, turn your lens to the infinity sign, and then using the back screen and the magnification feature, find the brightest light in the distance and then fine tune. You want that light to be a pin prick on the screen or through the eye piece. Again don’t be in a rush and keep fine-tuning it until you find the sweet spot. The difference between being perfectly in focus and slightly out of focus is micro millimetres.
I choose my settings based on the bioluminescence conditions I am presented with on the night.
Most times you have very little and not naked eye visible like this picture below.

Minimal amount and not really naked eye visible
Or you have insane amounts like this, albeit these are pretty rare in comparison to the non naked eye or very small amounts that I most commonly come across. The amount and naked eye visibility can honestly change in seconds from nothing to mind blowing or vice versa and it will change several times just in one night.

Large amount of bioluminescence rolling in with waves
If it is not very bright and not a lot around, longer exposures are necessary to pull out the colour. Other than a super long exposure, I have never exposed for longer than 20 seconds. Bear in mind these longer exposures smooth everything out so you lose a fair amount of texture and detail in the water. That is fine when you are faced with very low light conditions or if your aim is to have this sweeping smooth blue coloured foreground - they do make for amazing imagery, I must say.
If your goal is to capture these types of images, I would go with an exposure time of anything between 10 to 20 seconds. Set my ISO depending on how bright or dark the location is. I tend to find if the bioluminescence is not easily recognisable that you still have to push your ISO up. On these occasions, that generally also means you would have your aperture as wide as possible to get in as much light as possible.
I have included images below showing their settings for all to see covering different exposure times.

300 second exposure. There was not a lot of bioluminescence around and I wanted to capture the beautiful blue that was clinging to the sides of the rocks

30 second exposure. There was not a lot of water movement and so it did not matter whether I went short or long. The longer exposures brought out more detail and colour on this occasion
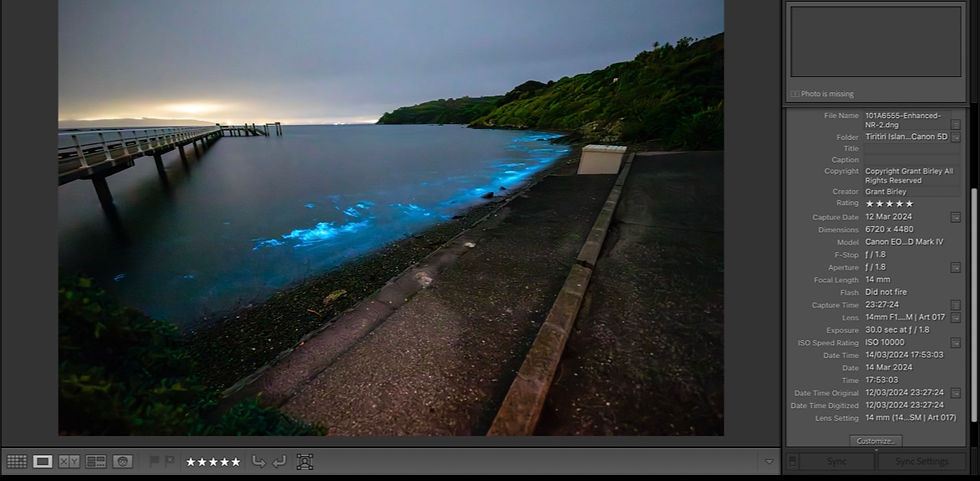
30 second exposure. The bioluminescence was very sporadic and so a longer exposure over a longer period captured more of it - look how high the ISO was
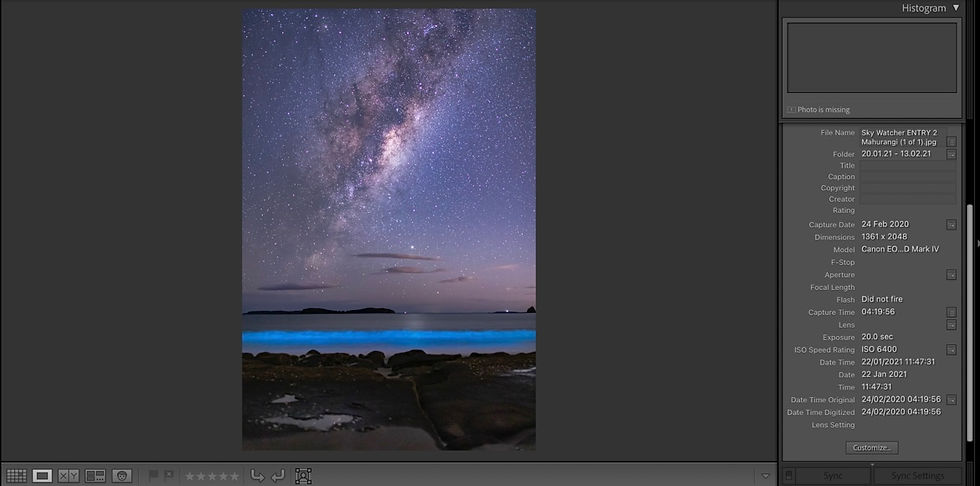
20 second exposure. To get the sky and bioluminescence balanced, I chose a longer exposure to get more detail in the sky but just enough not to blow the highlights out in the blue of the bioluminescence

15 second exposure. With the bioluminescence so far away it did not make a difference and to get enough light I needed to go longer.

10 second exposure.

10 second exposure. While the same expsoure time as the image above, the result is markedly different thanks to how different the bioluminescence was presenting and behaving. This image has a lot of detail considering how long the exposure was but that was due to the sheer amount that was around

8 second exposure

8 second exposure. Having to factor in other light sources and most notably light pollution makes it even more of a balancing act at times. This spotlight made things very difficult on the night and this was the only patch around too

6 second exposure
When it comes to the more vibrant and active bioluminescence, the stuff I really like to capture, I change my settings quite drastically. In these cases, like I have said before, I like to capture and show the detail, structure and most importantly the movement and textures that you find are so renowned in bioluminescence.
In situations like this, my exposure times can range from well less than a second up to five seconds. I find at five seconds the scene is already being smoothed out too much for my liking and so I generally tend to expose shorter.
My ISO is then set accordingly and because the shutter speeds are much faster, you may have to bump up your ISO unless you are faced with a scenario like we were recently where the bioluminescence is of such a nature that it lights up the foreground for you thereby allowing you to keep your ISO lower.
As for aperture, if I am wanting more detail and better focus, I will stop down and not go wide open, but I will make a decision on the night based on the circumstances.
Below are some examples of the shorter exposure times.

4 second exposure balancing minimal bio with excessive light pollution. Made harder by only a very small patch being active.

2 second exposure. Check the ISO needed to pull in enough light but just look at that detail
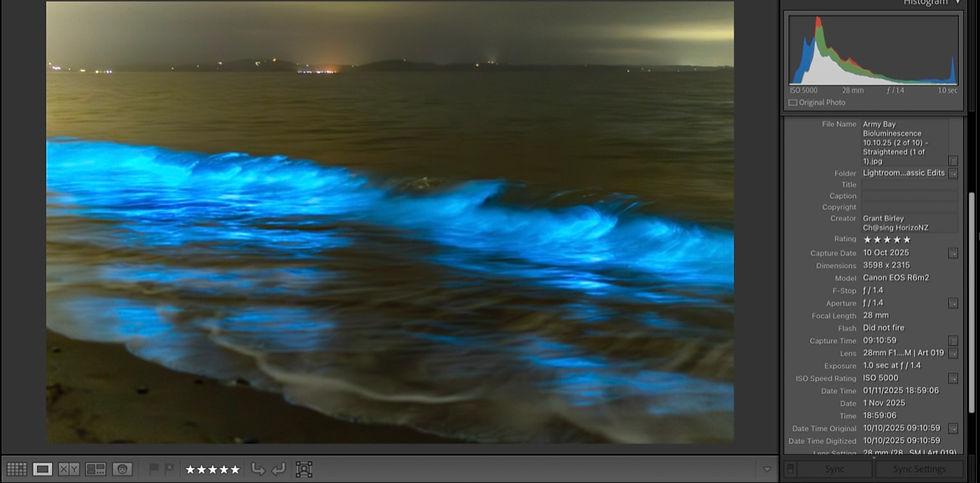
1 second exposure

0.8 second exposure. ISO again up there but just look at all that detail in the water, the wave and even a bioluminescence "fountain"! Capturing images like this is a good test of all your technical and editing skills but the results can be exceptional

1/8 second exposure. Look at the detail captured off to the right with the spray from the wave. Longer exposures would have smoothed that all out
If you look closely at the shorter exposures you can clearly see how much detail, texture and movement is present in the image. Bioluminescence is an extremely dynamic phenomenon. Longer exposures will smooth all that incredible detail right out.
Mobile phones
In my experience, bioluminescence is very tricky to capture with a mobile phone. Saying that, however, current mobile phones tend to do a pretty good job at night imagery these days. Same as if you were capturing with a big camera, you will need to use the night mode on your phone and adjust those settings accordingly. I have an iPhone and to be honest I do not find the generic settings to be incredibly conducive to good imagery.
You are able to get third-party apps that give you a lot more control over your settings and so I would encourage you to look into those. Again, like with a big camera, you will need the phone to be pretty still so on a tripod of some sorts or balancing against a rock, etc., would be recommended.
If you are blessed with a crazy vibrant show, you are able to capture it handheld like we did recently. Some of the newer phones also let you capture in RAW giving you more control with the post processing of an image. While I have captured in RAW I generally choose to capture in JPEG with my phone and use that as quick B-roll or quick images to post on socials as they are already edited.

Handheld iPhone image with settings
Video
Now for me personally, capturing video has to be the toughest. In my experience, the bioluminescence has to be pretty vibrant to be picked up on most video cameras. There are cameras that are well suited for videos in the still of the night, but for the most part, the majority of your DSLR cameras are designed more for still imagery. If you are blessed with a crazy vibrant show like we were recently, capturing the bioluminescence is pretty easy. I am no expert on video settings, but I just set mine to the highest ISO, the lowest aperture and the longest exposure time it allows. I have an example below. The downside is it ends up being a little on the grainy side.
On this night in question, it was super easy to film the bioluminescence and at times it was actually over exposing the scene. It was made even easier when the moon rose, lighting up the entire scene almost like daytime.
A video from the recent trip out - notice how grainy it is. Even with a crazy show like this and the moon, you have to push your ISO to get decent footage. I am sure there is excellent video software out there to remedy this but for me it's good enough

Back of camera for the video
In summary, this is how I would start out on a DSLR camera;
Set your exposure time at 15 seconds and your ISO between 32 and 6400
Have your lens wide open (basically the lowest aperture setting your lens is capable of e.g. f/2.8). If your lens is not capable of going so low, set it at the lowest number and bump up your ISO to compensate.
Take a few images like this and then evaluate them on the back of your screen.
Adjust your settings then accordingly.
If the blue is very vibrant and you would like more texture and detail then lower your exposure times and adjust your ISO accordingly.
If you have stuck it out and read all the way to here, THANK YOU.
I really hope this helps you capture the images you are after and will be proud to share.
REMEMBER, YOU WON'T KNOW IF YOU DON'T GO!
If you are heading out anytime soon, may the odds forever be in your favour and happy snapping!


Hi Grant, thanks for this detailed explanation, very easy to understand now to be able to get to shoot this phenomena, Adrienne